Deploy to Production With Digital Ocean, Github Actions, Nginx, Codespaces and Namecheap domain


Welcome to my zero-to-hero, In here we'll learn how to create a website live in production to become a real senior software engineer and a technology leader among your colleagues.
Why Do this Tutorial?
As Senior Engineers, we rely on our company infrastructure to lift us up and provide us with what we need. But it also means we depended on the company to succeed as individual engineers - which is bad(for both sides)
Having your own (a few dollars a month) development environments is a must for anyone who loves software engineering.
You'll learn how the entire code-to-production flow works (on a small scale).
you'll learn how to log in to a remote server with the terminal - woohoo!!
Requirements
Digital Ocean account - click here to get a FREE 200 USD worth of credit (it's a referral link).
Open an account at namecheap.com - the domain can cost you 1-10 USD a year.
Github.com account - and a new repository.
Basic terminal commands - cd, cat, ll, ls, vim (how to exit from vim)
ubuntu - you'll be fine :)
SSH key generator - you'll be fine :)
Ngnix - we'll install Nginx in ubuntu. Maybe with proxy. Don't worry it's easy
Passion
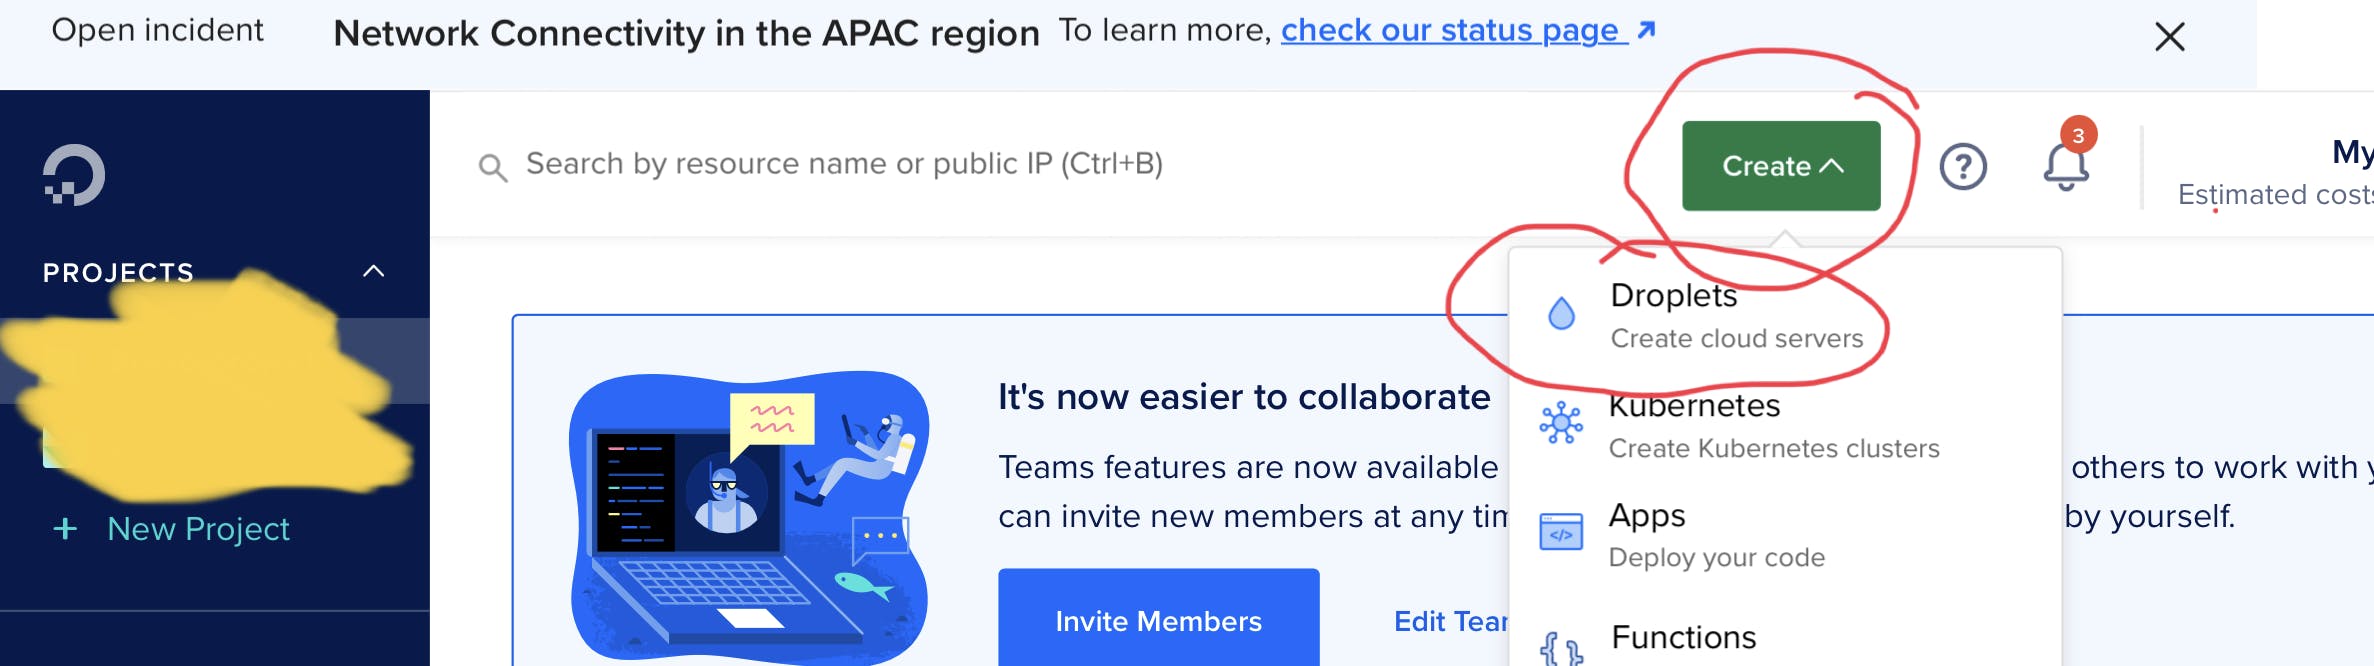
Create a Digital Ocean Droplet
The reason we love Digital Ocean is that its developer friendly, easy to setup, comes with cookbooks and anything you need to become a hero engineer. Also, it's not mortified expensive like AWS.
Droplet - is a simple name for "server" that simply contains different setups of configurations like ubuntu, Linux, fedora, GPU optimized, memory-optimized running whatever engines we want for routing like Nginx or running code like nodejs or webrick for ruby or apache2 for PHP and pretty much whatever you want!
In your droplet you can configure whatever you want, we need a basic setup that will allow us to maintain a folder of our site with static HTML and we'll be installing Nginx to route the domain that we'll have to the correct folder.
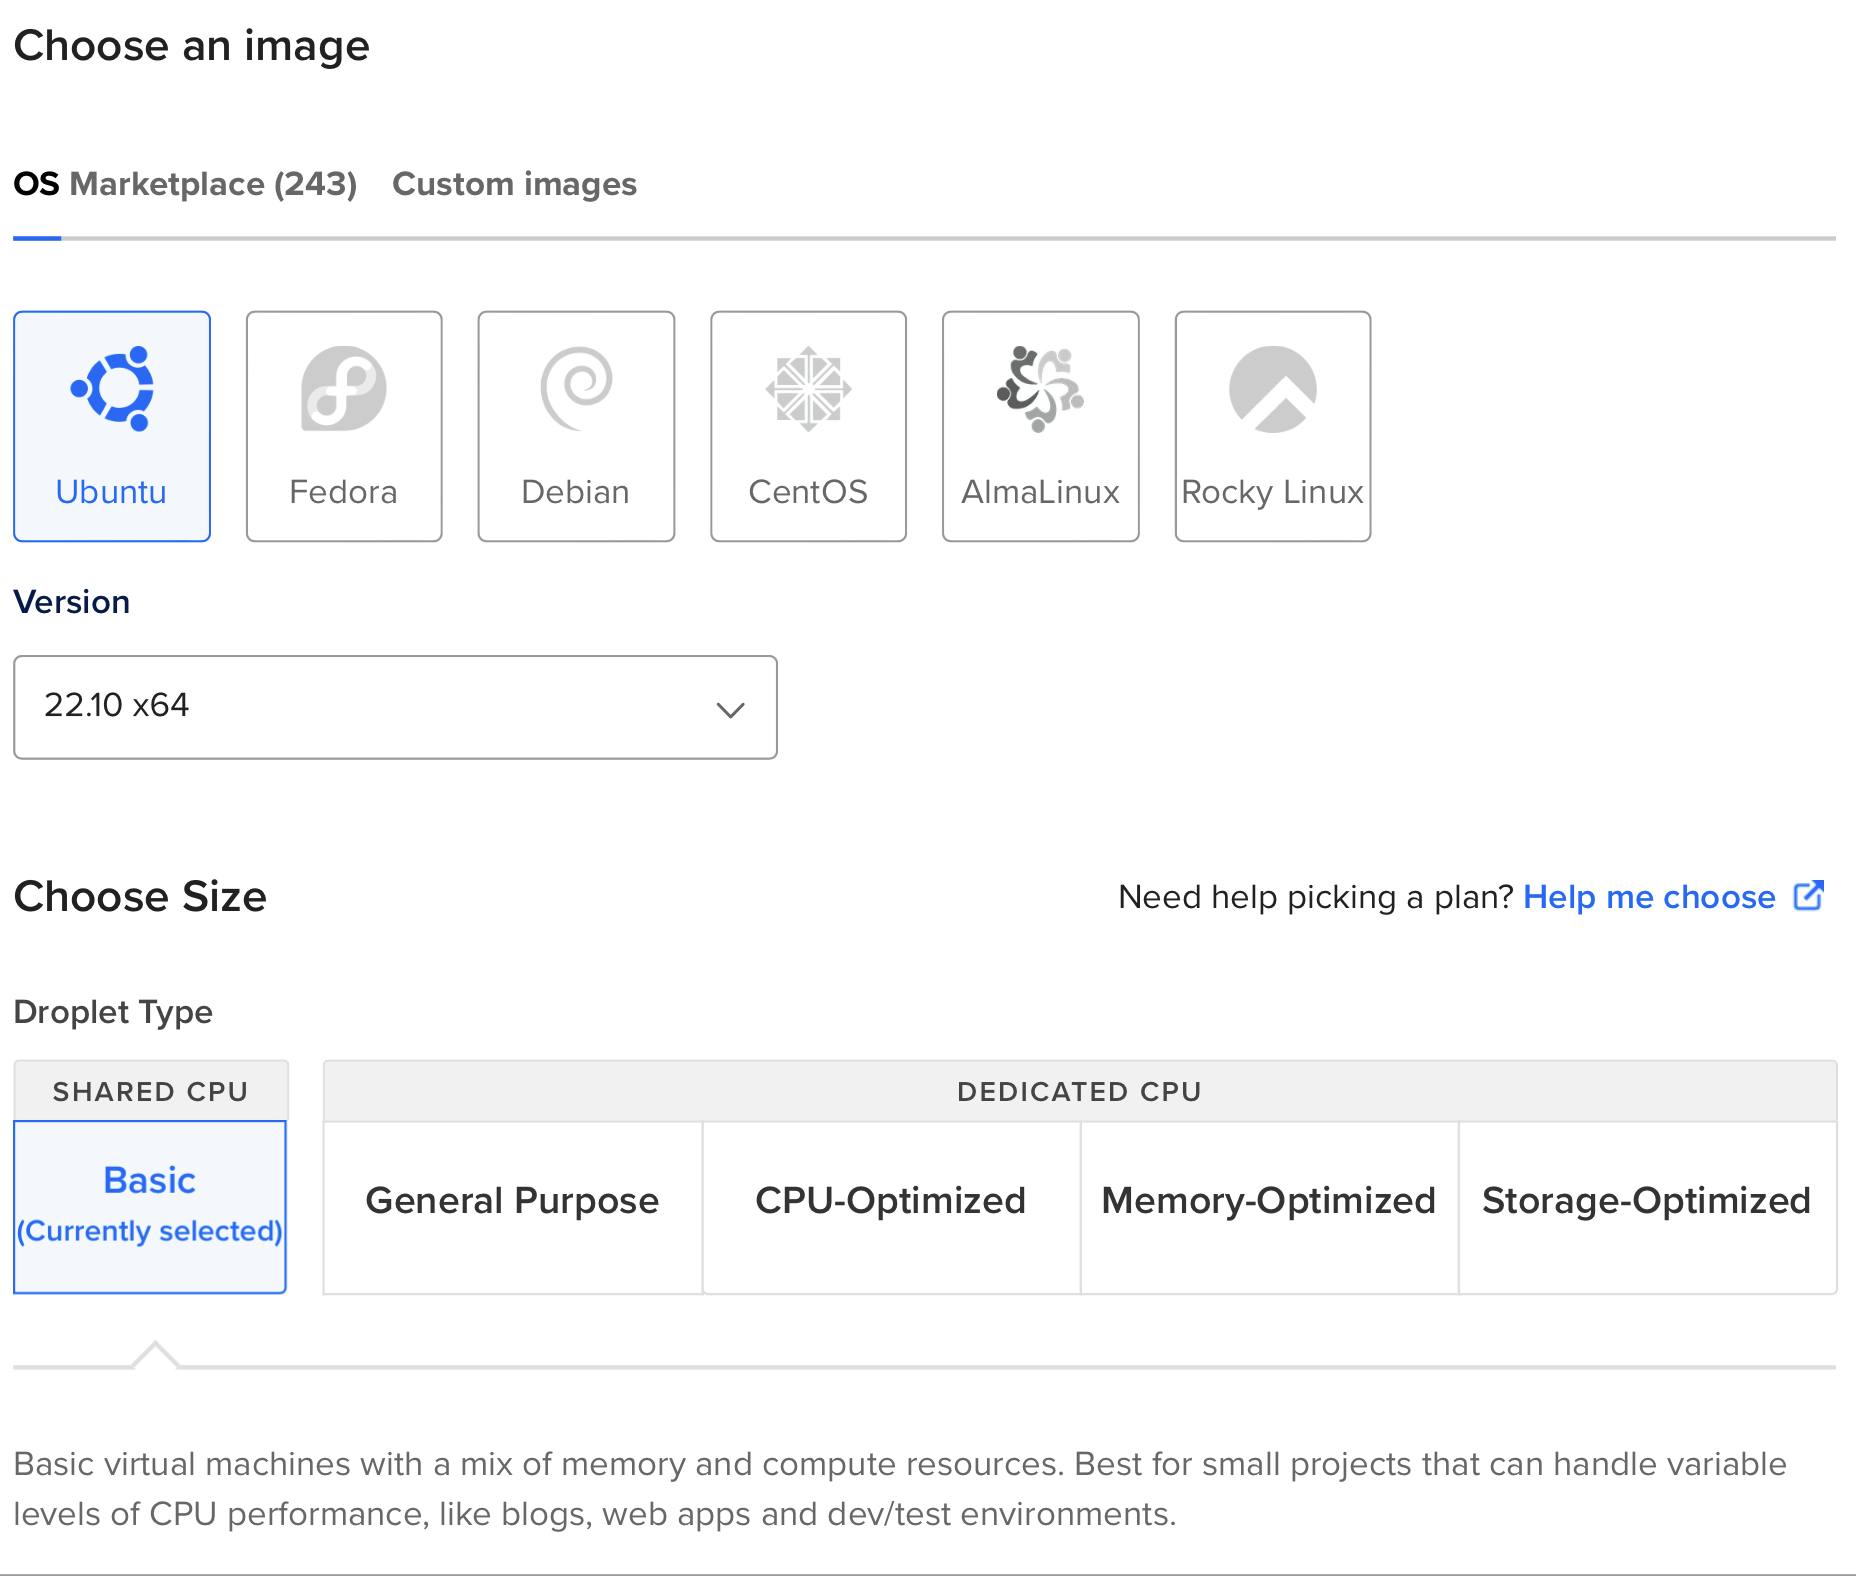
Let's pick an image
We want to work on ubuntu as it's the bare bone of our server, we'll have the most flexibility to learn and understand how everything behind a website works. We'll also pick "Droplet type" Basic as it's the cheapest option (and we are cheap engineers)
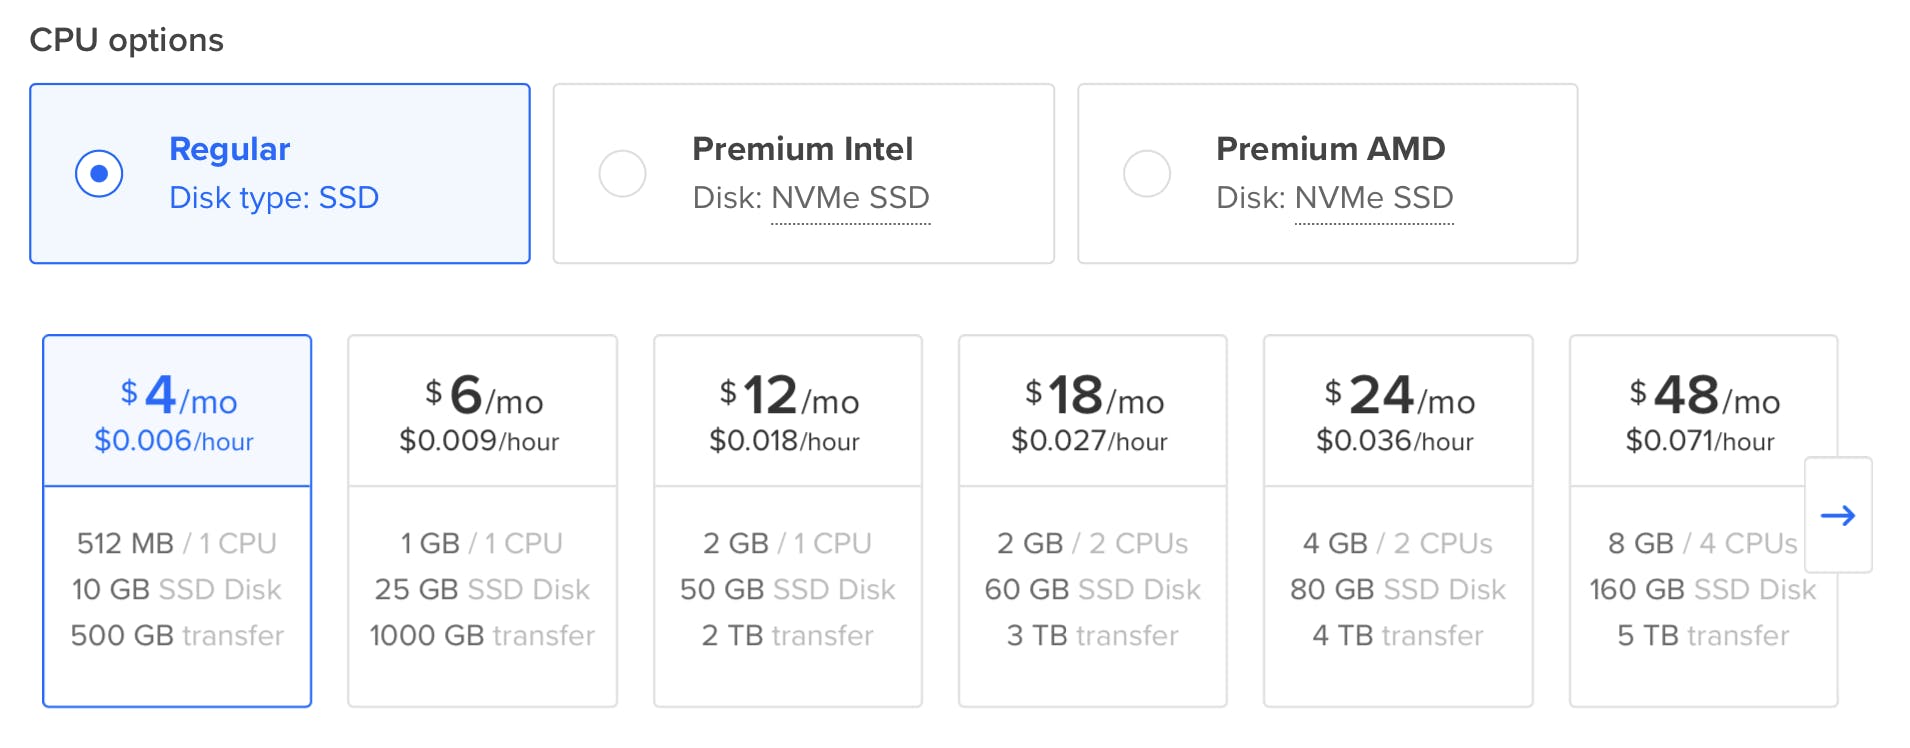
Now we want to define Our droplet storage type, in this case, a regular disk of SSD and we'll pick the basic machine 512MB/1 CPU / 500GB transfer
Transfer - aka Bandwidth, or in another word the machine data transferred to our customers is limited to 500GB which is a lot for a fun-project (it's mostly used by DO to protect themself from abuse of their services).
SSH gate
After we'll create our machine, we want to "jump into" the machine and configure the server, play around with the files, and setup whatever we want for our machine. To do so we want to create a new SSH key (private and public) to be used for us to connect to the remote server (to connect to the droplet) and play around with it.
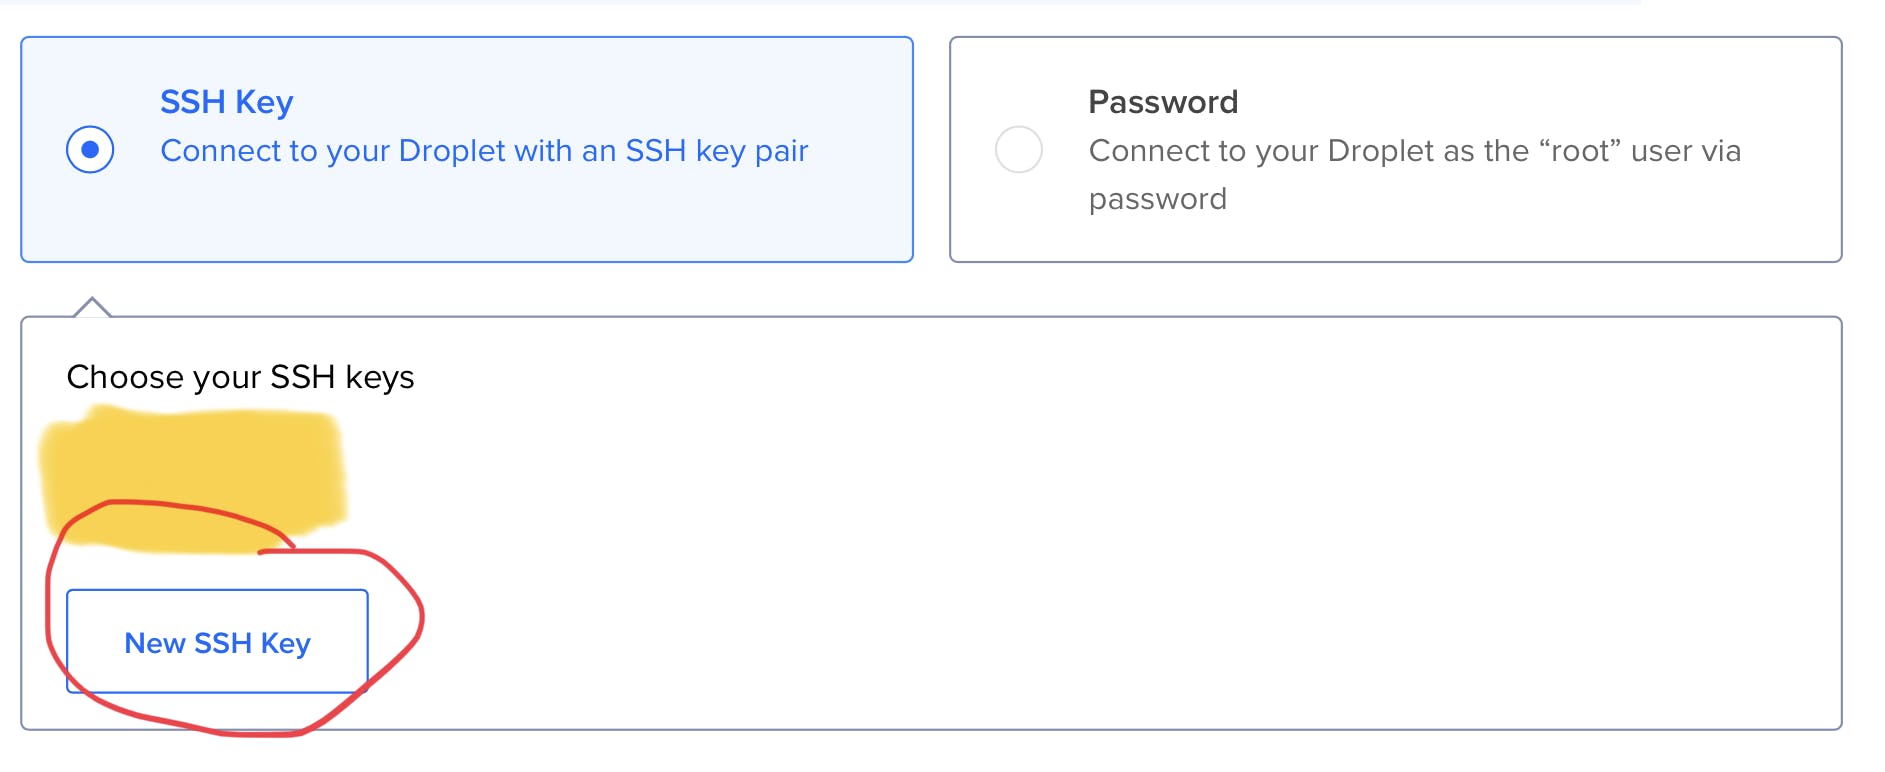
Once you'll click "new SSH Key" you'll see this window:
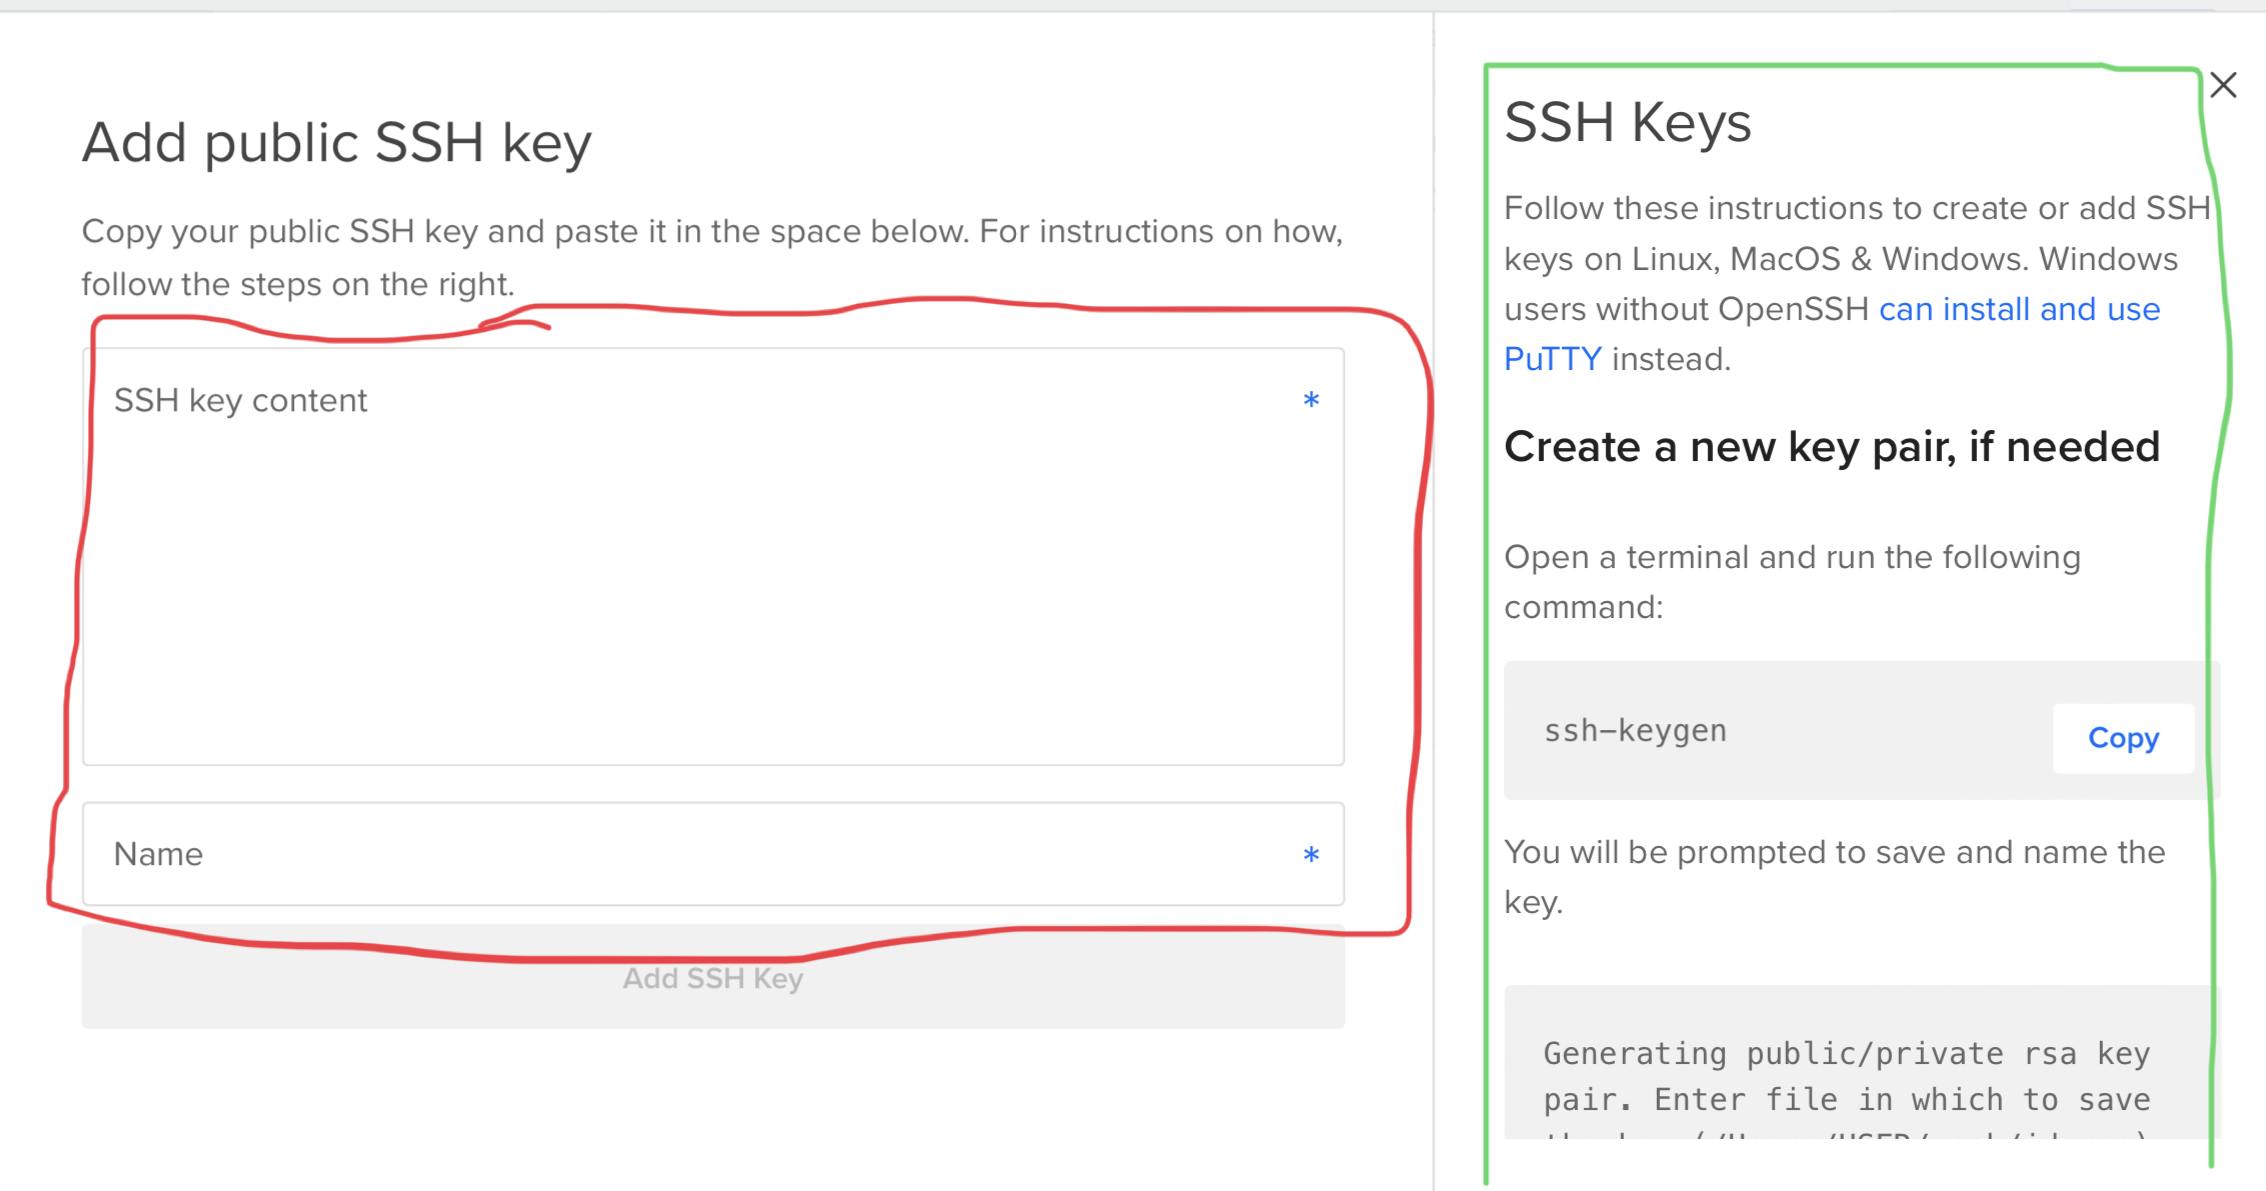
This is a basic tutorial that teaches us how to generate an ssh key
What SSH allows us to do? It allows us to use one machine (our computer) to connect to a remote server (to digital ocean droplet) and config the server as we deem right - or in other words, pretend we are DevOps and hackers.
How do SSH keys work?
Local machines (our computer or tablet in my case) generate a key public & private.
we put the public key into the destination machine (the droplet) - now the remote server (droplet) expects a specific signature when someone tries to login.
with the key in our local machine and the remote server IP we'll be able to login into the remote server! (We'll get the IP of the droplet/remote server from the digital ocean once we create our server)
How to generate the SSH key
In your terminal type:
ssh-keygenYou'll be ask to name the file of the key (do as you please)
           Enter passphrase (empty for no passphrase):
           Enter same passphrase again:
You'll end up with 2 files (one is a public key one is a private key). Example: id_rsa and id_rsa.pub or id_ed25519 and id_ed25519 - the difference in the name are simply the different encryption. Ed25519 is considered to be better.
View and copy the file:
cat ~/.ssh/id_rsa.pub # or type ll ~/.ssh to see the name of the keys!Copy the content of the file (the key) into the above digital ocean UI "text box"(SSH Key content)
Feel free to read more about SSH keys on digital ocean
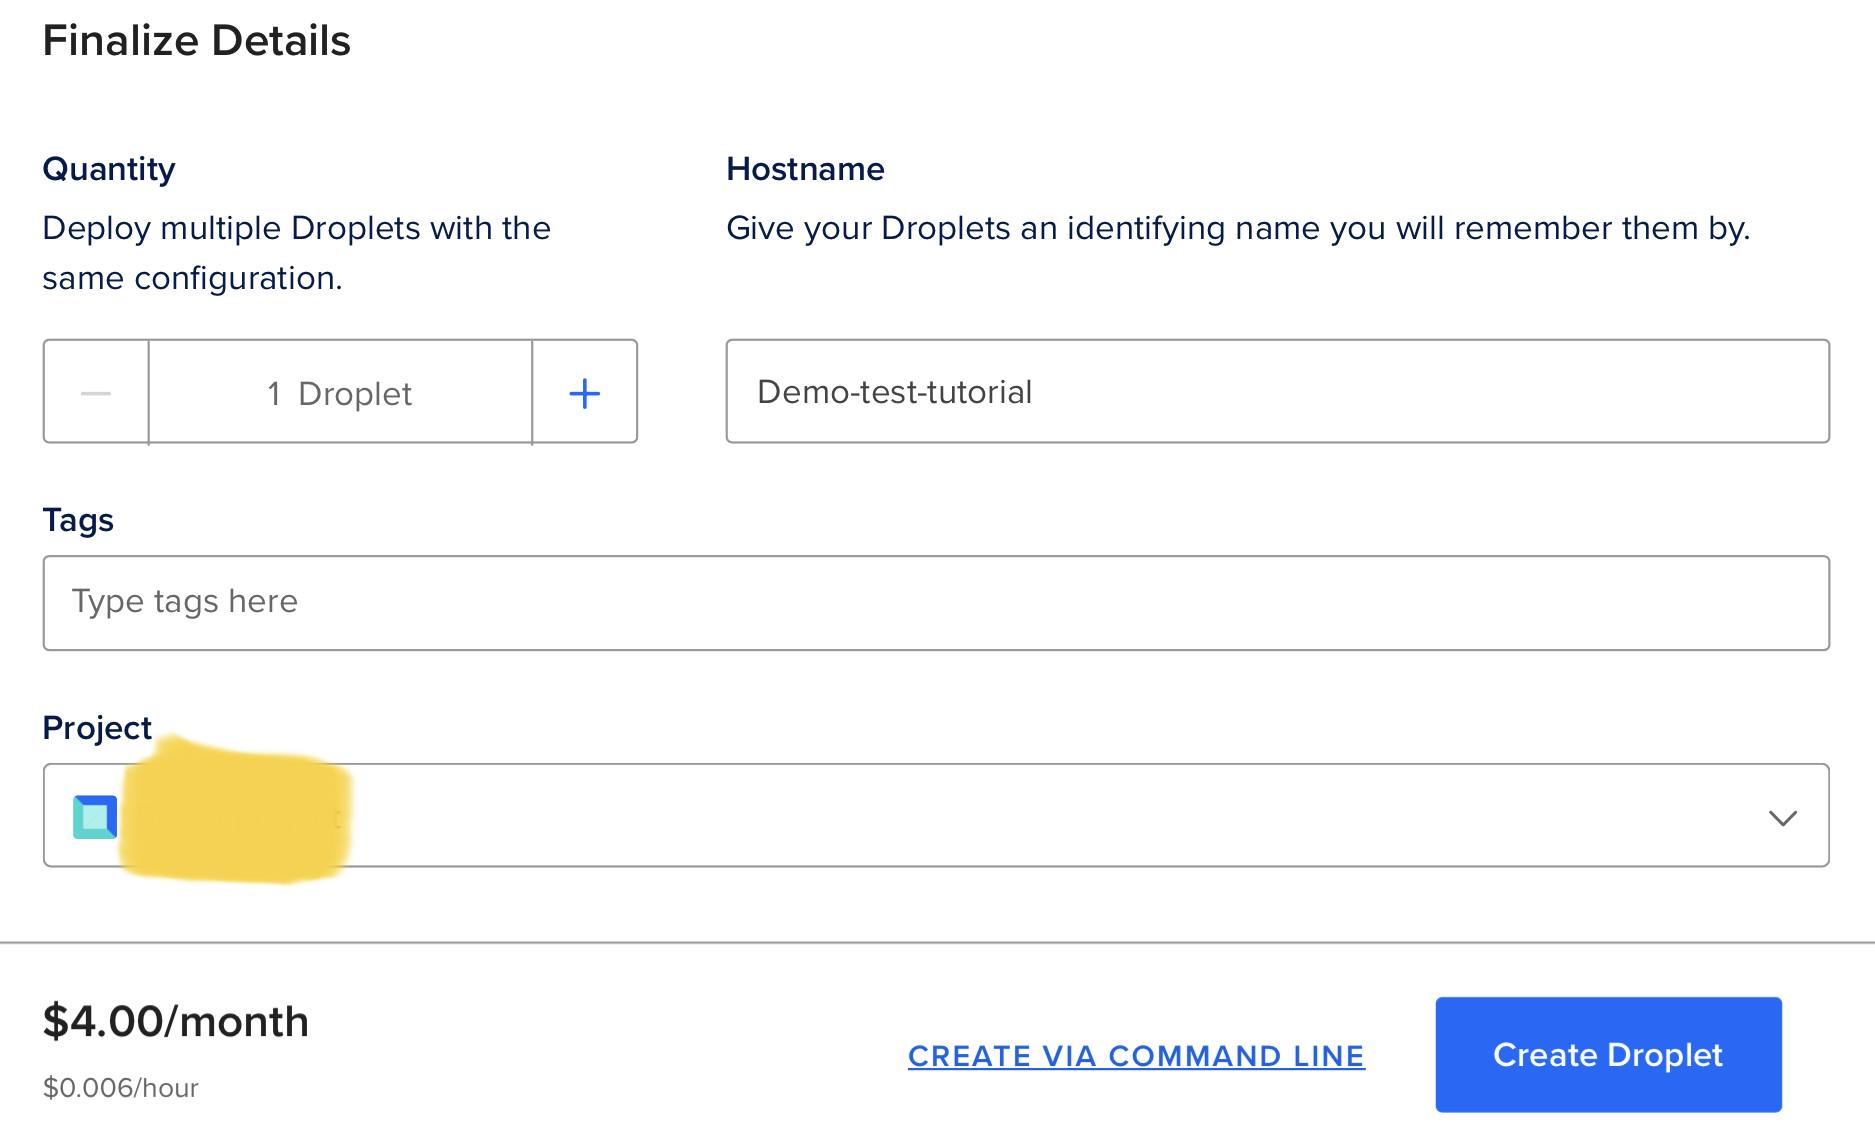
We've called our SSH key "demo-test-tutorial" and also our hostname "demo-test-tutorial"
Hey, look! We have our remote server & we have our IP (note that I've blanked the IP with a yellow marker):
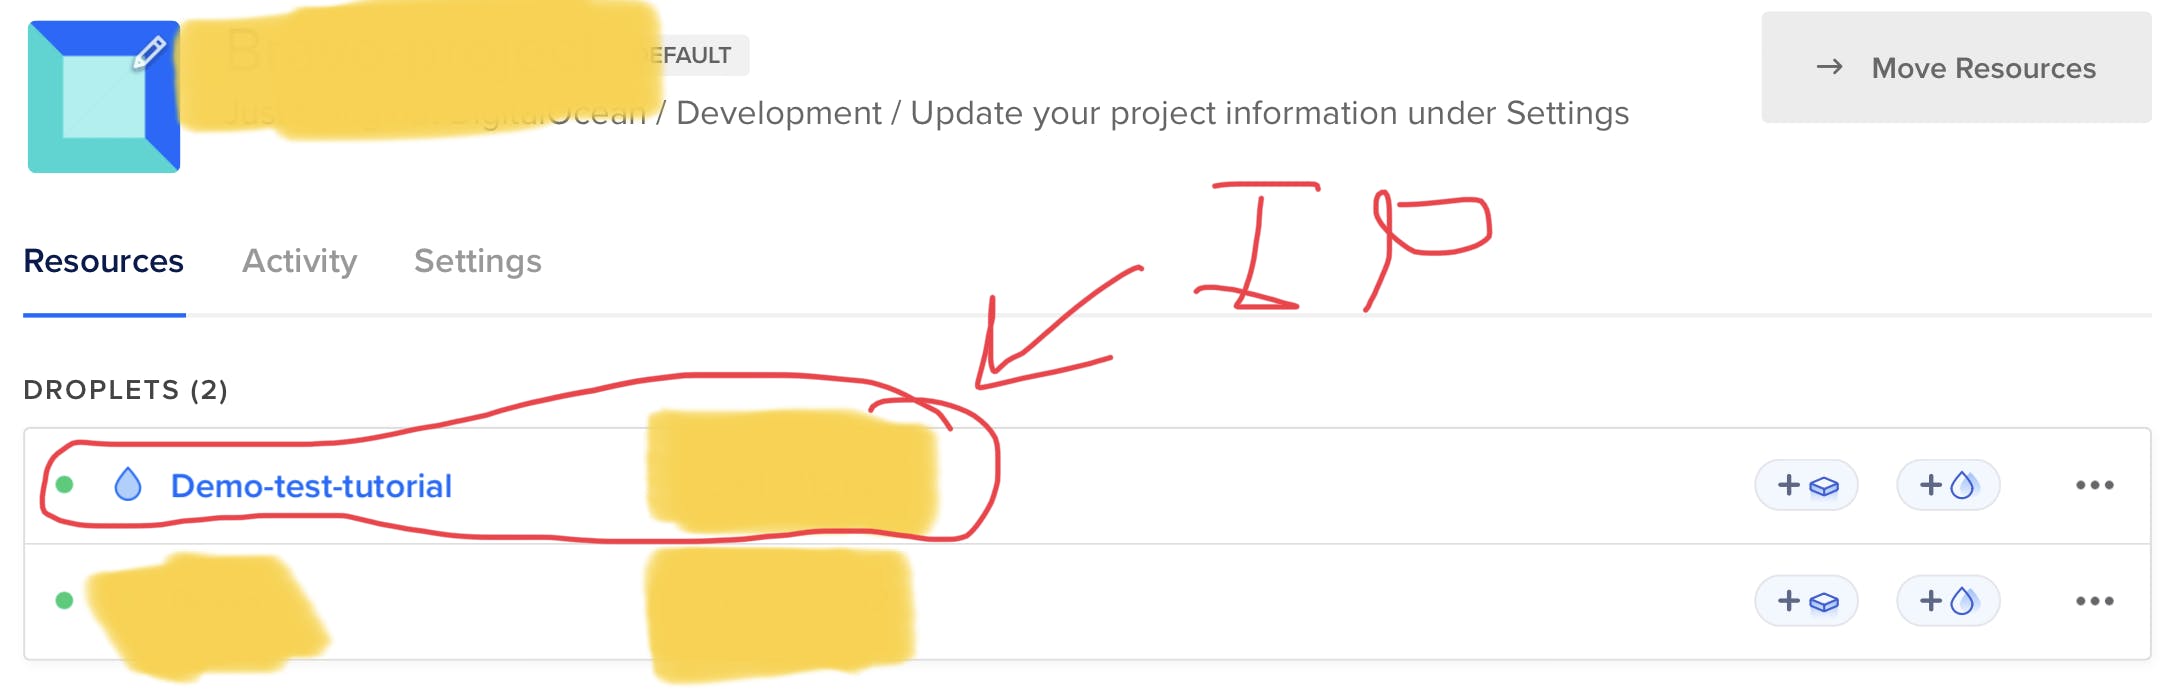
Now you can connect via SSH to a remote server/droplet
In your terminal write:
ssh your_username@host_ip_address # e.g ssh root@<digital_ocean_server/droplet_ip>
If you still have problems, given the public key & private key & remote server IP and user (in ubuntu case it's "root") read here more:
Read here more about how to connect via SSH
Here's another good article on how to connect via SSH
We are in:
Buy Domain & Config DNS
Note: you can do the same with any other domain provider. Not just Namecheap.
Create an account at namecheap.com
Config the DNS to point to your own digital ocean server - inside namecheap.com dashboard clicks "domain list" on the right side.
Then click little arrow on the side of the domain you want to change then click "manage"

Let's edit the DNS of that domain, as right now they are pointing to Namecheap parking dns.
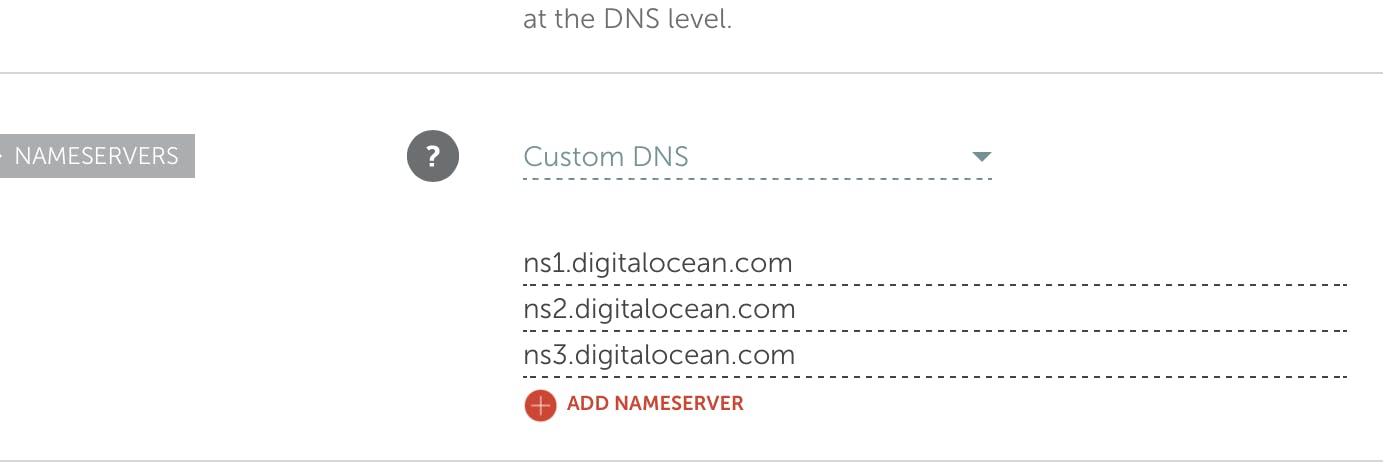
We are using digital ocean DNS servers 1 to 3:
ns1.digitalocean.com
ns2.digitalocean.com
ns3.digitalocean.com
Add domain to your digital ocean droplet
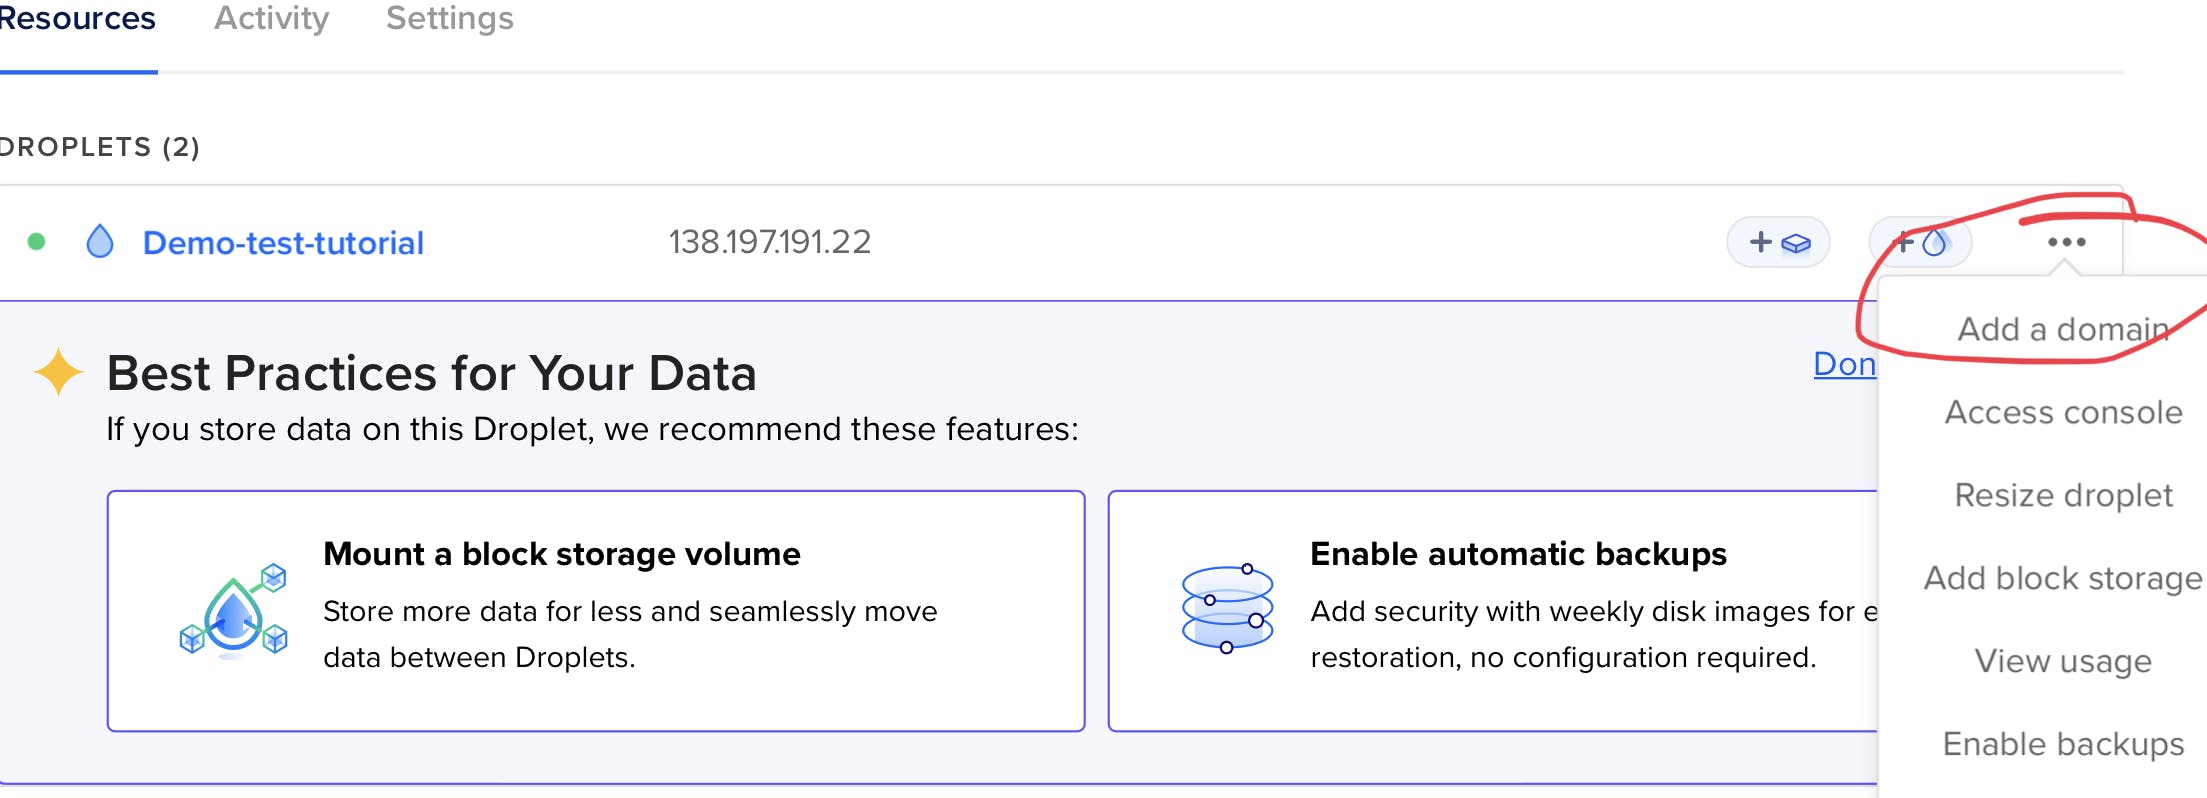
Inside Digital Ocean we'll config the domain we bought ("hostname") with the droplet ip, this is how it should look in your digital ocean domain dashboard:
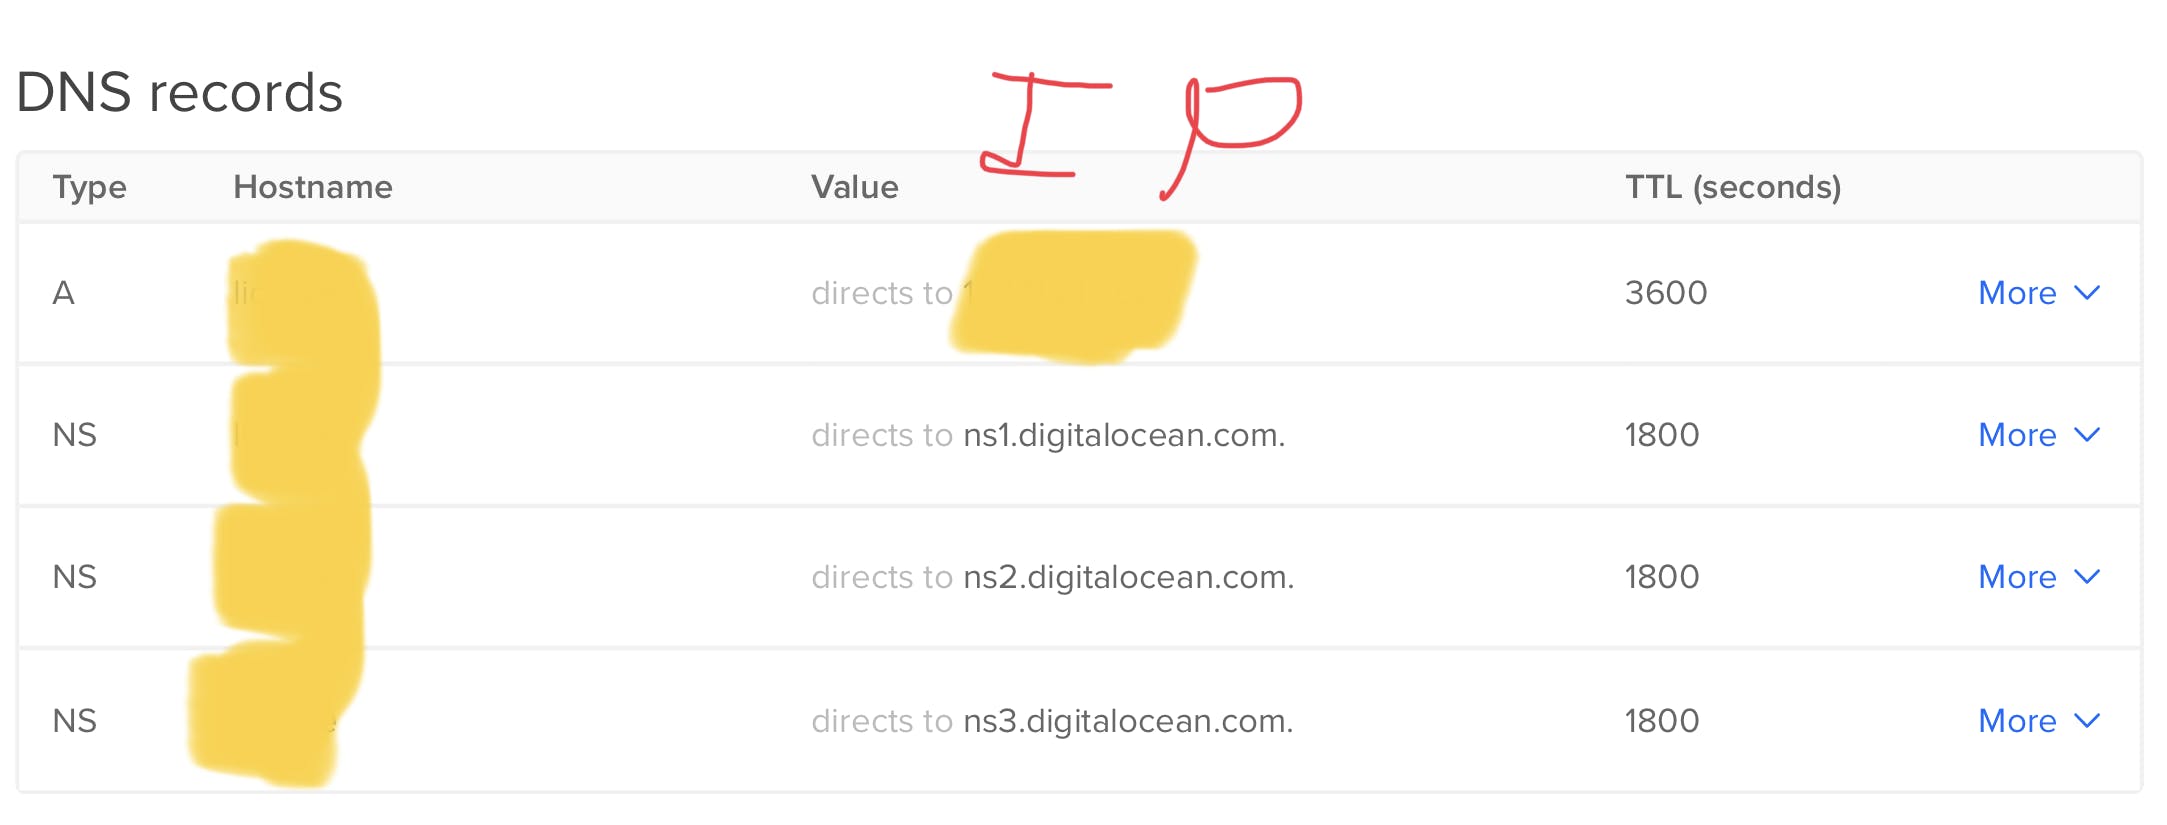
Netorking -> domain (tab) -> more -> manage
Once we'll create an html file in our remote server and config ngnix to point to the correct routing path - we'll see our site up and running!
Setup ngnix
Since our server is bare bone ubuntu, we'll need to install ngnix ourself. Remember we connected from our personal local machine via SSH? In that SSH terminal, inside the remote-server-droplet. We'll be installing ngnix:
sudo apt update # update apt of ubuntu to get latest version of ngnix
sudo apt install nginx # install ngnix. Might be ask to type "yes"
sudo ufw allow 'Nginx HTTP' # set ngnix config to HTTP
First line of code we'll update apt of ubunt, the second one install ngnix itself and the third simply config what kind of ngnix routing we want, http (other options are: HTTPS, ngnix full)
Let's verify the change:
sudo ufw status # should output all "allow"
Let's confirm the Nginx server is running:
systemctl status nginx # should output "Active: active"
Woohoo!
At this point, you should be able and go to your IP, and see the default Ngnix HTML page:

Example: http://<remote-server-droplet-digital-ocean-ip>
Read more about how to set Ngnix in ubuntu 20
Let's create an HTML page
First, we want to create the correct folder. Run the following commands and change "your_domain":
sudo mkdir -p /var/www/your_domain/html # create folder
sudo chown -R $USER:$USER /var/www/your_domain/html # give permission
sudo chmod -R 755 /var/www/your_domain # we give the right permission of read
Chown allows us to change the permission of the file/folder. 777 means "all" can read/write/search and 755 means that "owner" can read/write/search.
Let's create the index.html page instead of the default Nginx one:
sudo nano /var/www/your_domain/html/index.html # nano is terminal editor
Let's add whatever HTML we want:
<html>
    <head>
        <title>Welcome to your_domain!</title>
    </head>
    <body>
        <h1>Hello World</h1>
    </body>
</html>
To save the file inside Nano in the Terminal: press CTRL+X then you'll be prompted to type "y" to save the following "enter".
To test the above change, let's use the "cat" command to read the file:
cat /var/www/your_domain/html/index.html
In order for Nginx to point to the above folder path, we'll need to config Nginx to do so:
sudo nano /etc/nginx/sites-available/your_domain
Here's a Basic Nginx config:
server {
        listen 80;
        listen [::]:80;

        root /var/www/your_domain/html;
        index index.html index.htm index.nginx-debian.html;

        server_name your_domain www.your_domain;

        location / {
                try_files $uri $uri/ =404;
        }
}
Now we want to create a symbolic link for Nginx:
sudo ln -s /etc/nginx/sites-available/your_domain /etc/nginx/sites-enabled/
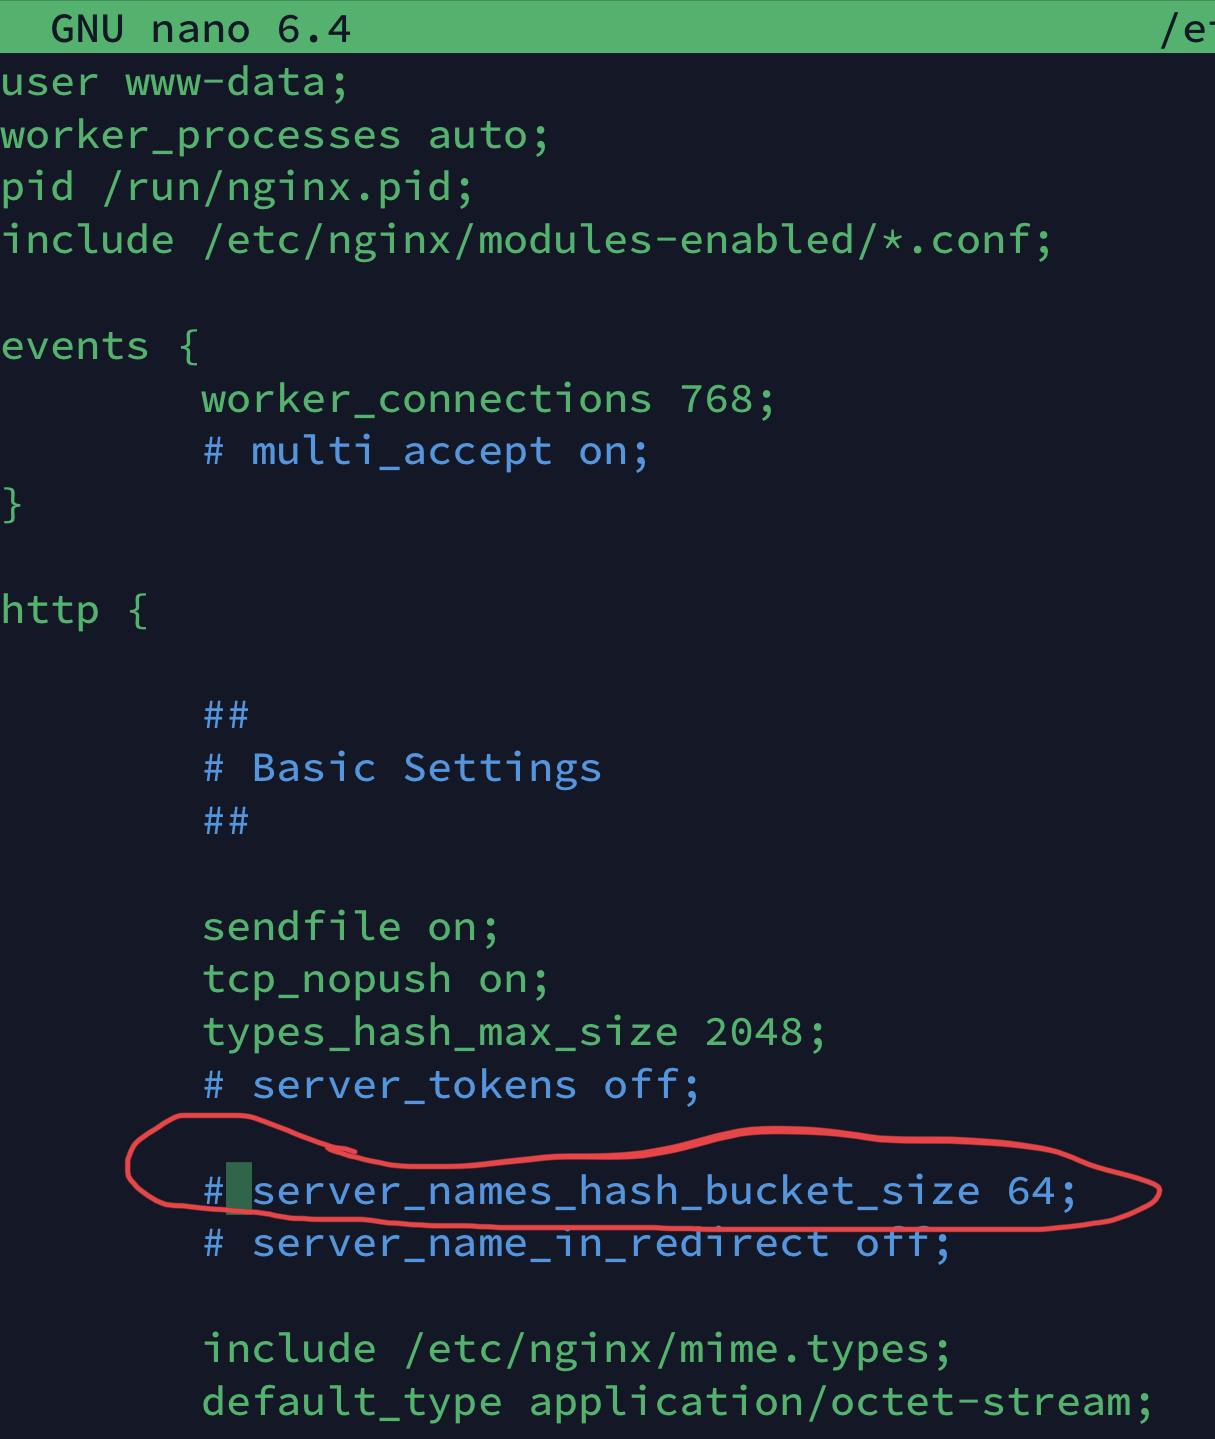
Without diving into too many details, and to avoid memory problems with Nginx. We'll allow a feature in it's global configuration file:
sudo nano /etc/nginx/nginx.conf
In that file with the help of nano the editor of the terminal in ubuntu, we'll look for "server_names_hash_bucket_size" and remove the comment "#" (ctrl + w will make it easier to find the server_names_hash_bucket_size).
This part is the part where most engineers are failing, with some mistakes in the configuration, missing space or extra commas. So to test it. Let's run the below command:
sudo nginx -t
The expected output:
nginx: the configuration file /etc/nginx/nginx.conf syntax is ok
nginx: configuration file /etc/nginx/nginx.conf test is successful
Assuming there are no problems, let's run a restart to Nginx:
sudo systemctl restart nginx
Woohoo! Now Nginx will serve your domain!
Important: when updating DNS domains it might take some time, few minutes to hours and some cases 24 hours! So take this step easy.
Problems?
The most common problems are syntax errors or changing Nginx config without restarting the server via systemctl. Otherwise, feel free to ask in the comments below!
Create Github Repository
Of couse we don't want to code and write files inside SSH remote server via nano editor! what we do want as solo engineers is to have a git repository and each time we commit to "main" branch, there should be a simple automatic process that will place our code inside our remote-server-droplet!
Create Github Repository
When creating the repo, create it with a readme file to make our life easier from the UI of GitHub.
Create GitHub Environment Variables
Before we go to create our automated incredible deployment, we need to create environment variables in our newly created GitHub repository so GitHub we'll be able to connect to the remote-server-droplet that we've created previously and perform the automated tasks that we want it to do, in this case. Copy the files from GitHub repo to the remote-server-droplet (with SSH connection)
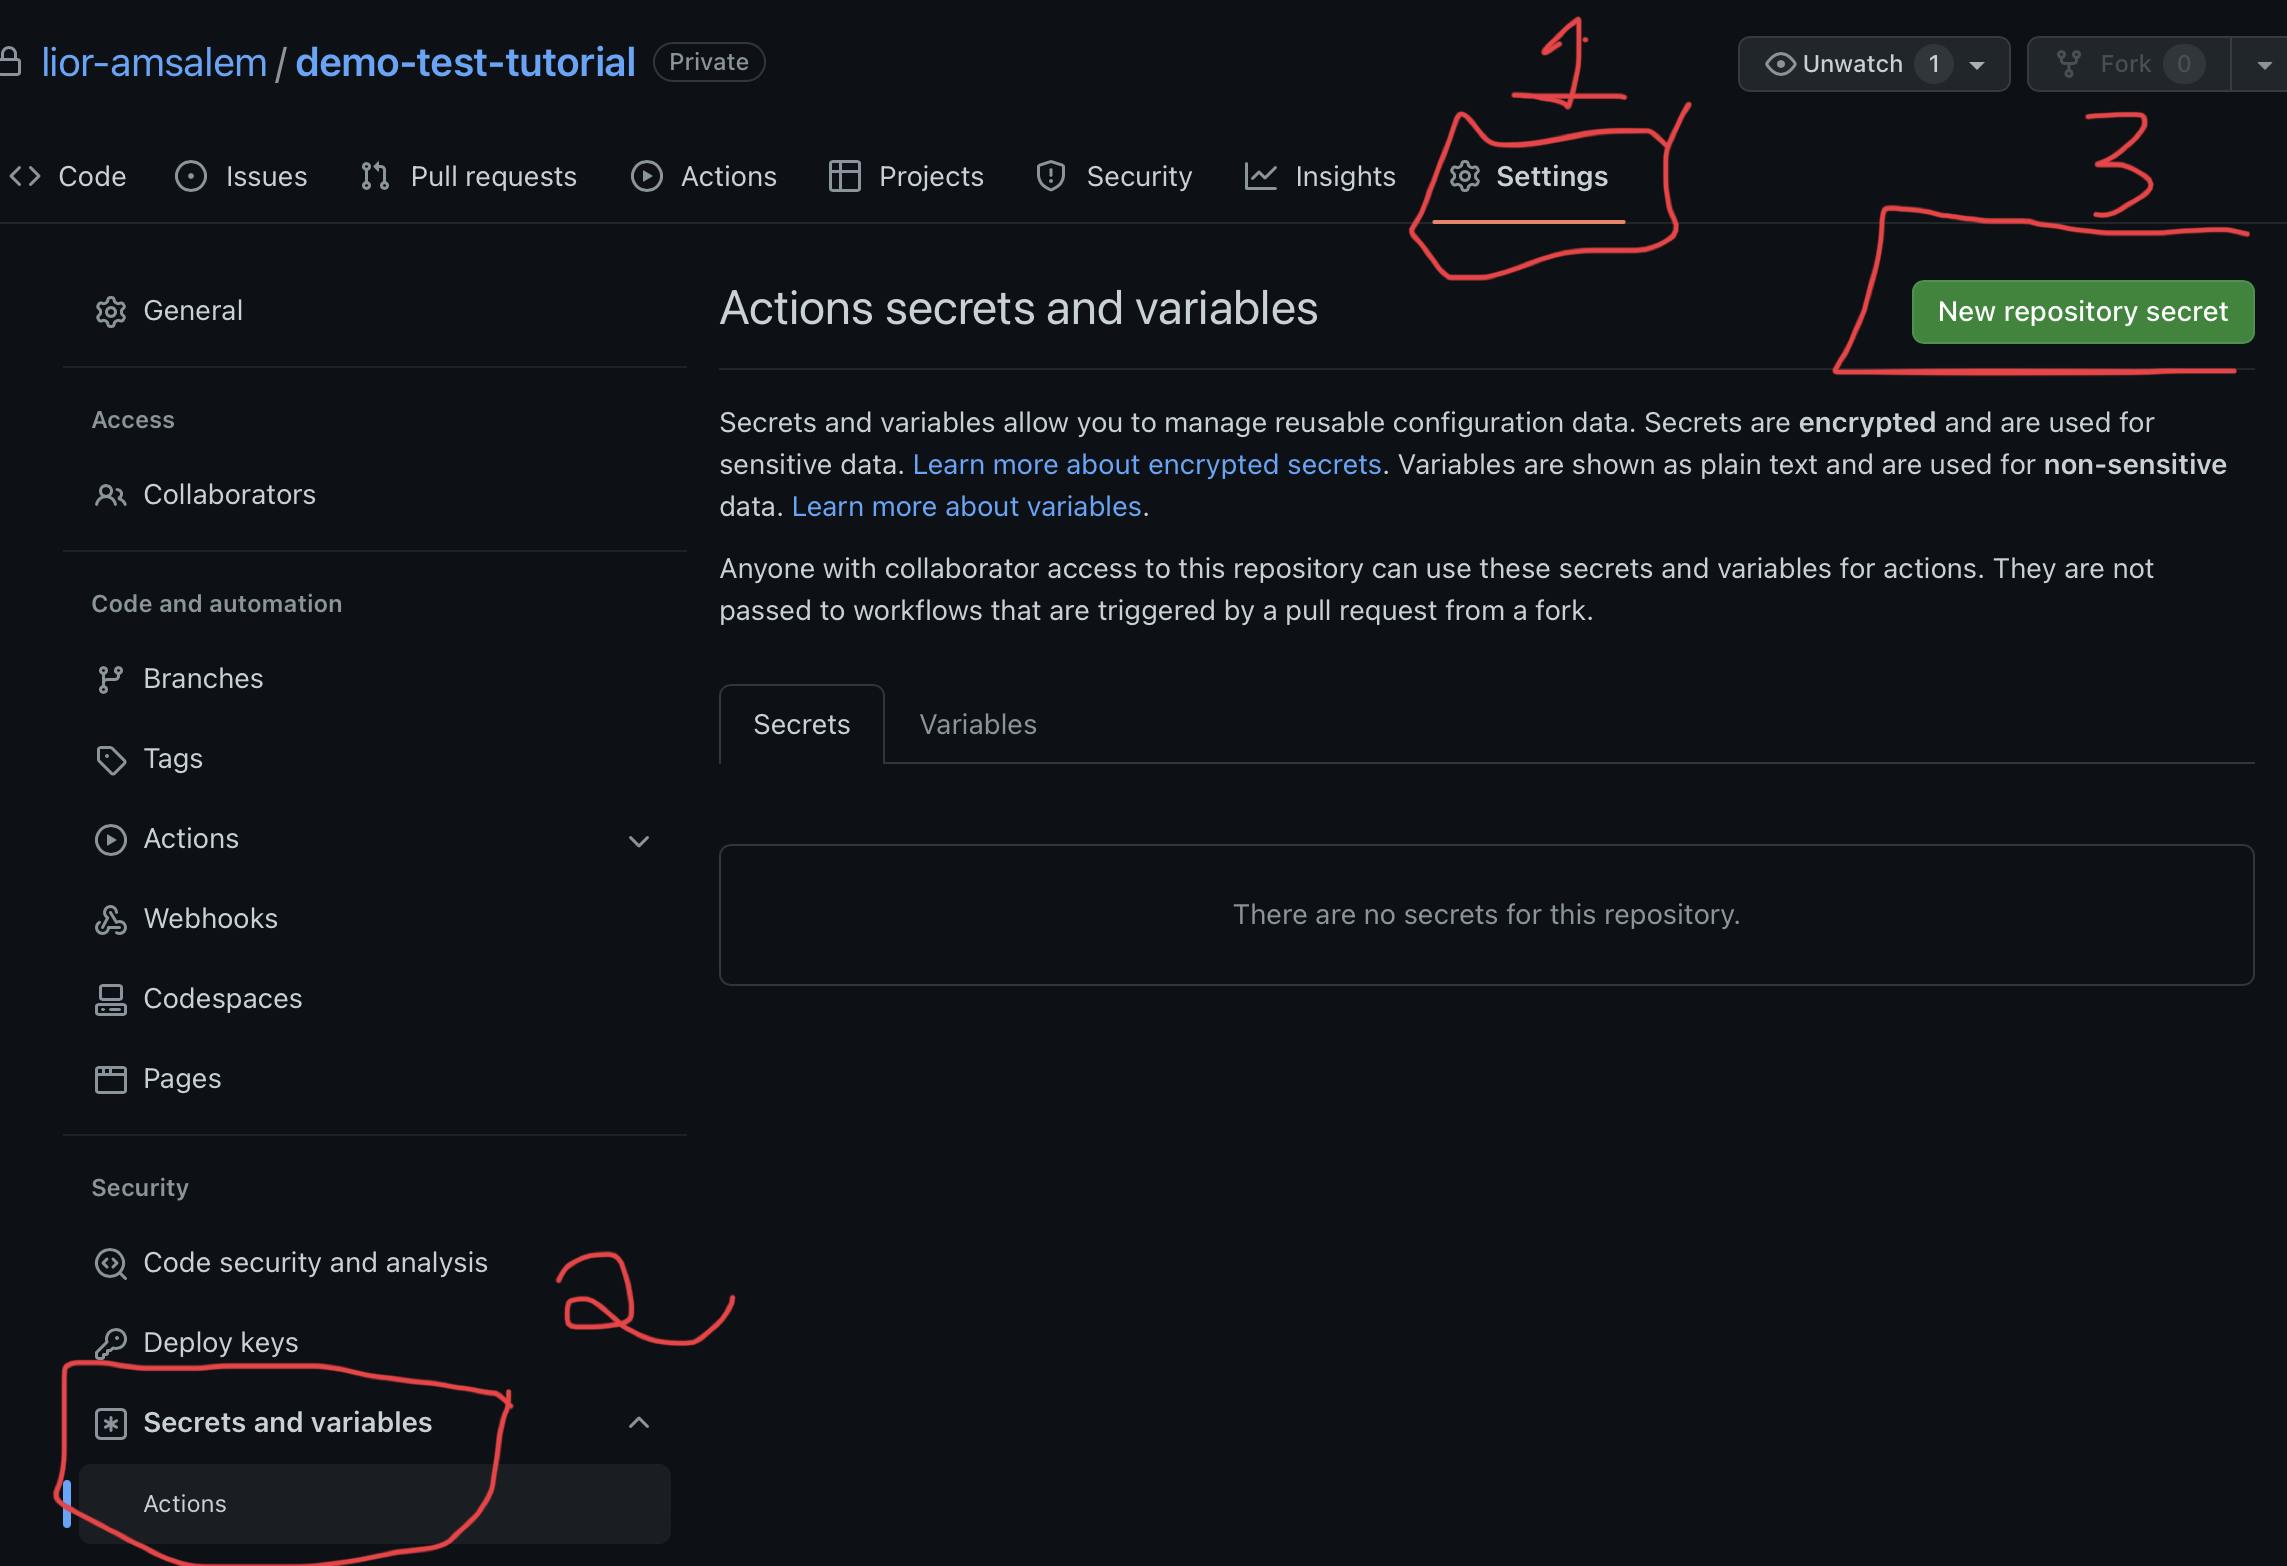
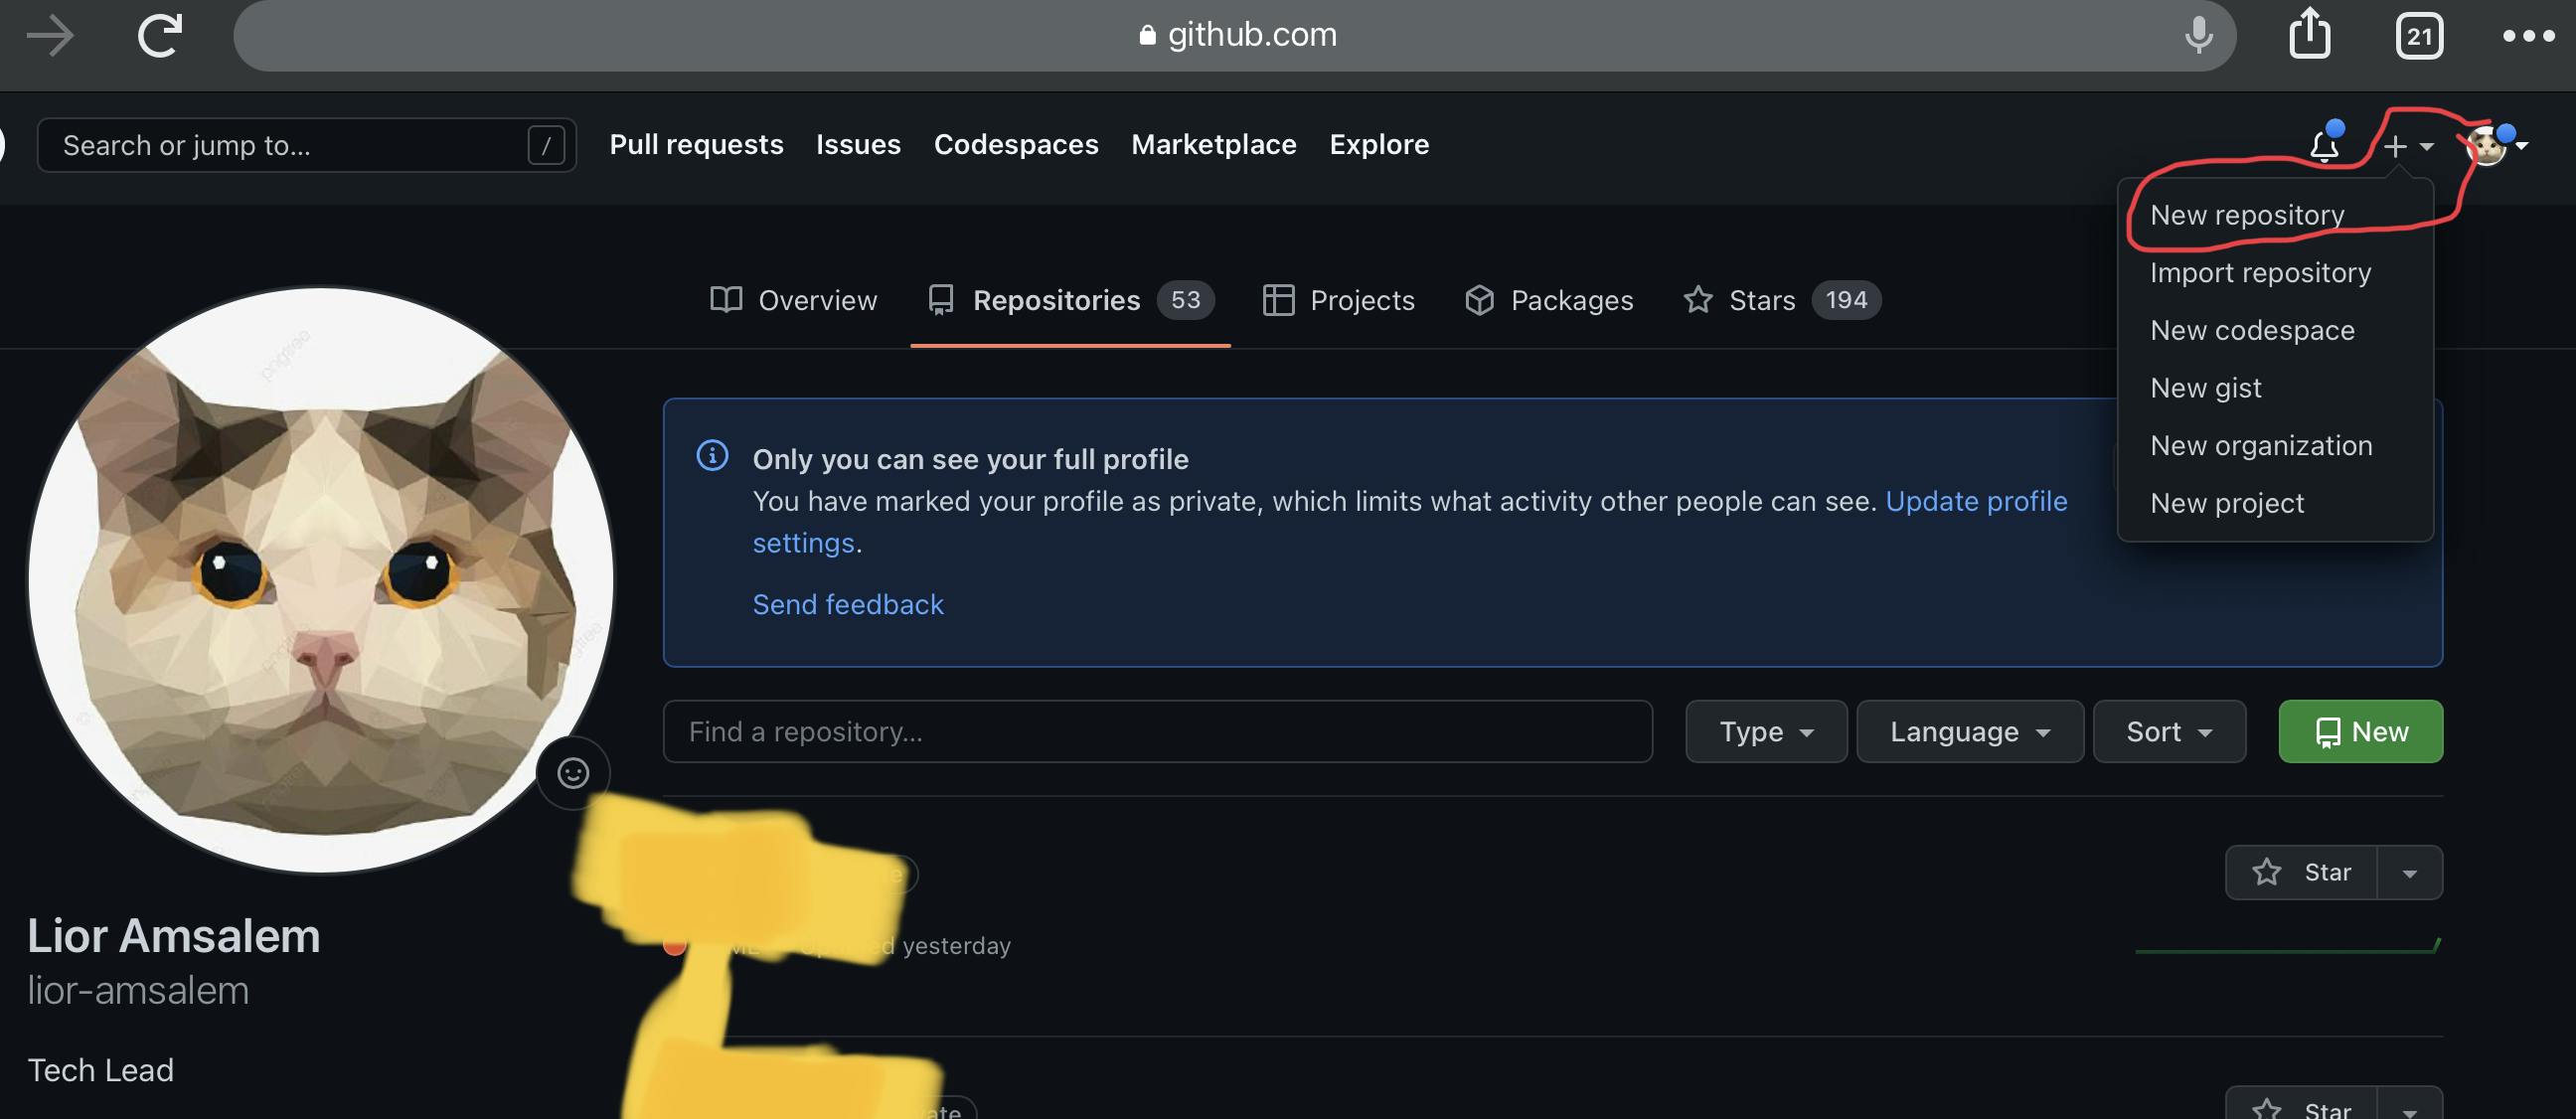
Click "settings" in your github repository
Click "secrets and variables"
Click "new repository secret"
Let's create 2 secrets:
SERVER_IP - is our remote-server-droplet (see in digital ocean dashboard)
SSH_PRIVATE_KEY - is our locally-generated SSH private key
SSH private key can be found at the local machine where we generate the key:
ll ~/.ssh # to see the files. Look for id_rsa or ed_25519
cat ~/.ssh/<file_name> # to get the private keyand copy it to github
Create Github Actions
Github actions - allow us to pick pre-define automted actions from github actions marketplace and use them to do deployment or other automated process. In this case we'll NOT pick existing github action but we'll write the process of deployment ourself (to learn the backbone of the process of a deployment).
Note that this can be extended, you can use Digital Ocean offical deployment github-action or add docker build, kubernetes, automted tests, quality asserence tests and much more!
In our github, click "actions" -> pick "simple workflow" by github -> this is what you'll see:
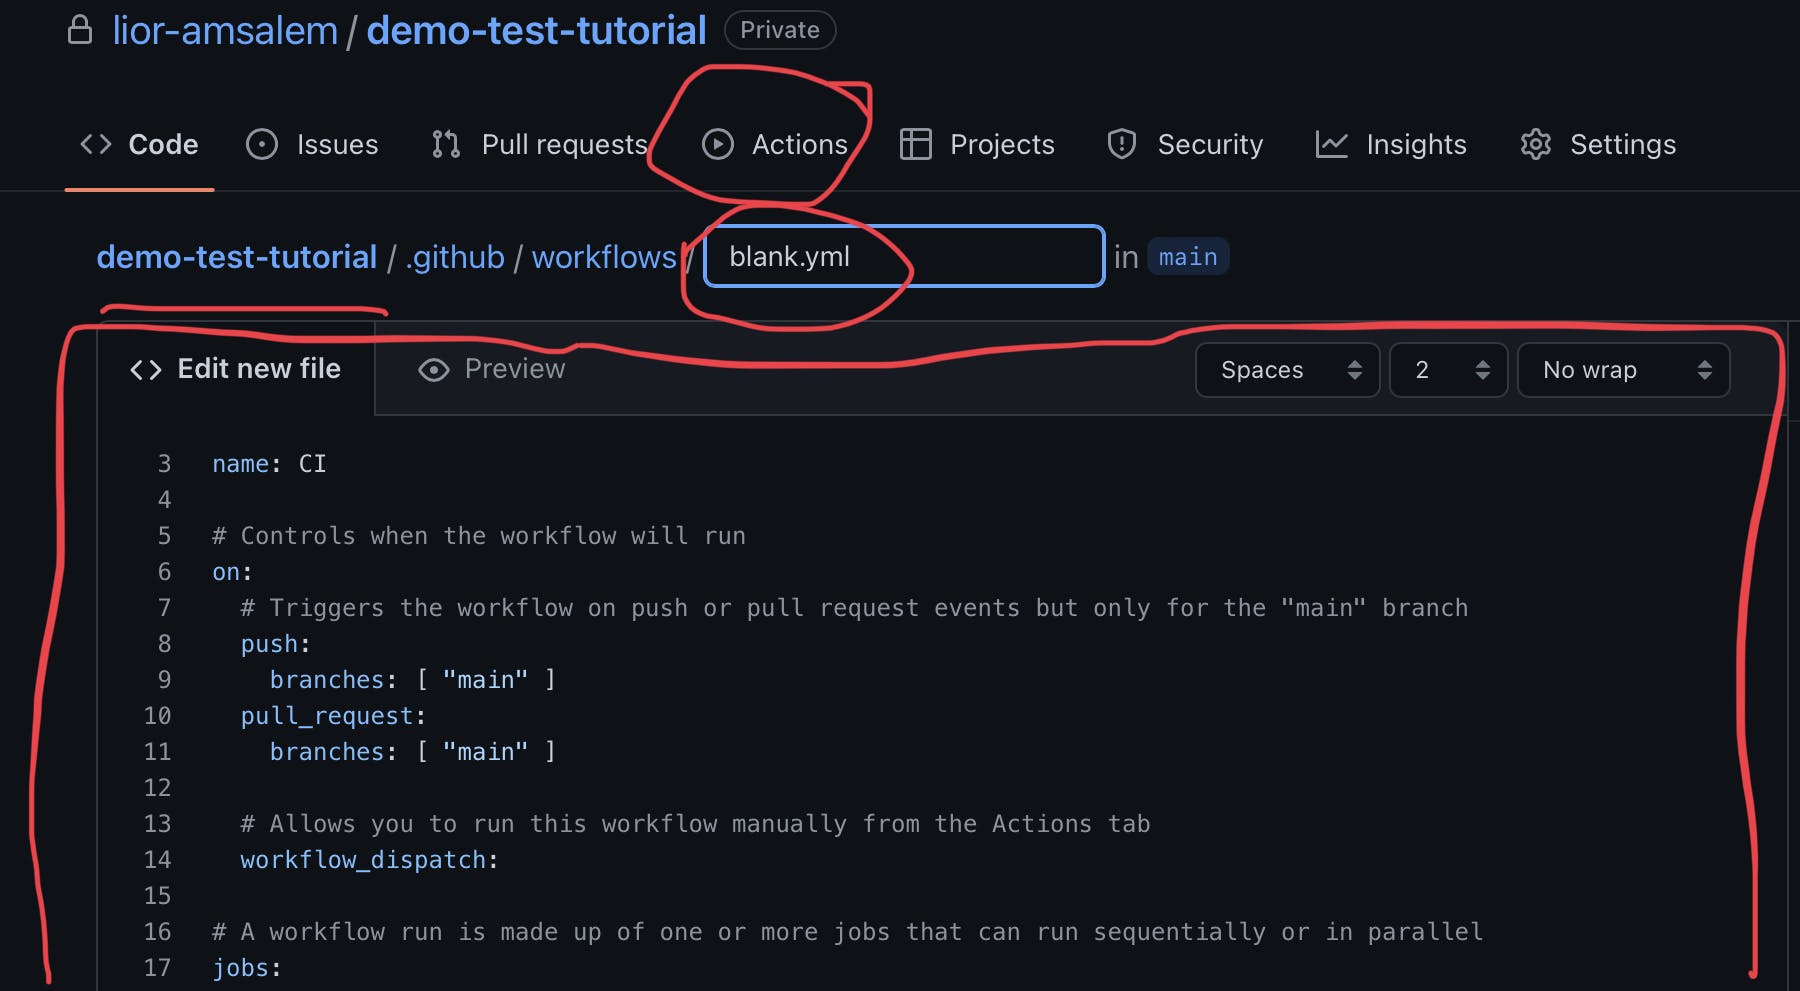
Change blank.yml to deploy.yml
Remove all basic workflow and replace it with below SSH connecting & deployment code below:
name: Build and Deploy
on:
  push:
    branches:
      - main
jobs:
  build-and-deploy:
    runs-on: ubuntu-latest
    strategy:
      matrix:
        node-version: [12.x]
    steps:
      - uses: actions/checkout@main
      - name: Deploy
        run: |
          eval $(ssh-agent -s)
          ssh-add <(echo "$SSH_PRIVATE_KEY" )
          mkdir -p ~/.ssh
          chmod 700 ~/.ssh
          ssh-keyscan $SERVER_IP >> ~/.ssh/known_hosts
          chmod 644 ~/.ssh/known_hosts
          scp -r * root@$SERVER_IP:/var/www/your_domain
    env:
      SSH_PRIVATE_KEY: ${{secrets.SSH_PRIVATE_KEY}}
      SERVER_IP: ${{secrets.SERVER_IP}}
      CI: false
Important: it might take you a few attempts, or 40 attempts - but don't give up and keep trying!
Tada! You've deployed from GitHub to remote server

Conclusion
Every time we push to "main" there will be an automated process that takes the code from GitHub into the digital ocean remote server droplet!
This code is not meant for an enterprise company. It's for learning and personal usage
You can take this code and improve and change whatever you want (as we do as engineers)
Resoucres: how to apply enviroment vars / secrets in github actions